Monday, August 30, 2010

Post #21, 8/30/10 Radio-Dash repair, Radiator Support, RF floor

65 Mustang Restoration 


Sorry it's been so long since my last post,,, just extremely busy. We've been working on the car, off & on, but just haven't had time to do any posting. 

Over the last couple of weeks, we finally got around to installing the right side floor pan. We coated the inside of the frame sections that would soon be covered by the floor pan, with Eastwood's Rust Encapsulator. On the ledges of the frames, where the floor would be welded at, we sprayed those areas with a weldable primer,, which was also sprayed on the front end of the car, where the radiator support & battery apron will go.


We then went through the fun of welding in the floor pan. We used a combo of welding techniques,,, spot welding, where the panels overlapped or rested against each other,,, and several feet of butt welding, along the front, center, and a bit of the back side. This takes a lot of time and patience to keep from warping the panels. Since we went the extra mile to butt weld the panels together,,, and since the metal is a rather thin gauge,,, Brent was under the car holding the copper spoon against the seam,,, moving it around as we skipped around with the welder.


 Self-tapping screws are very useful to suck the floor pan down to the frame sections,,, definitely something you do before any of the welding is done. As you can see in the next pic,,, I've got a good start on smoothing out the welds(where needed). 


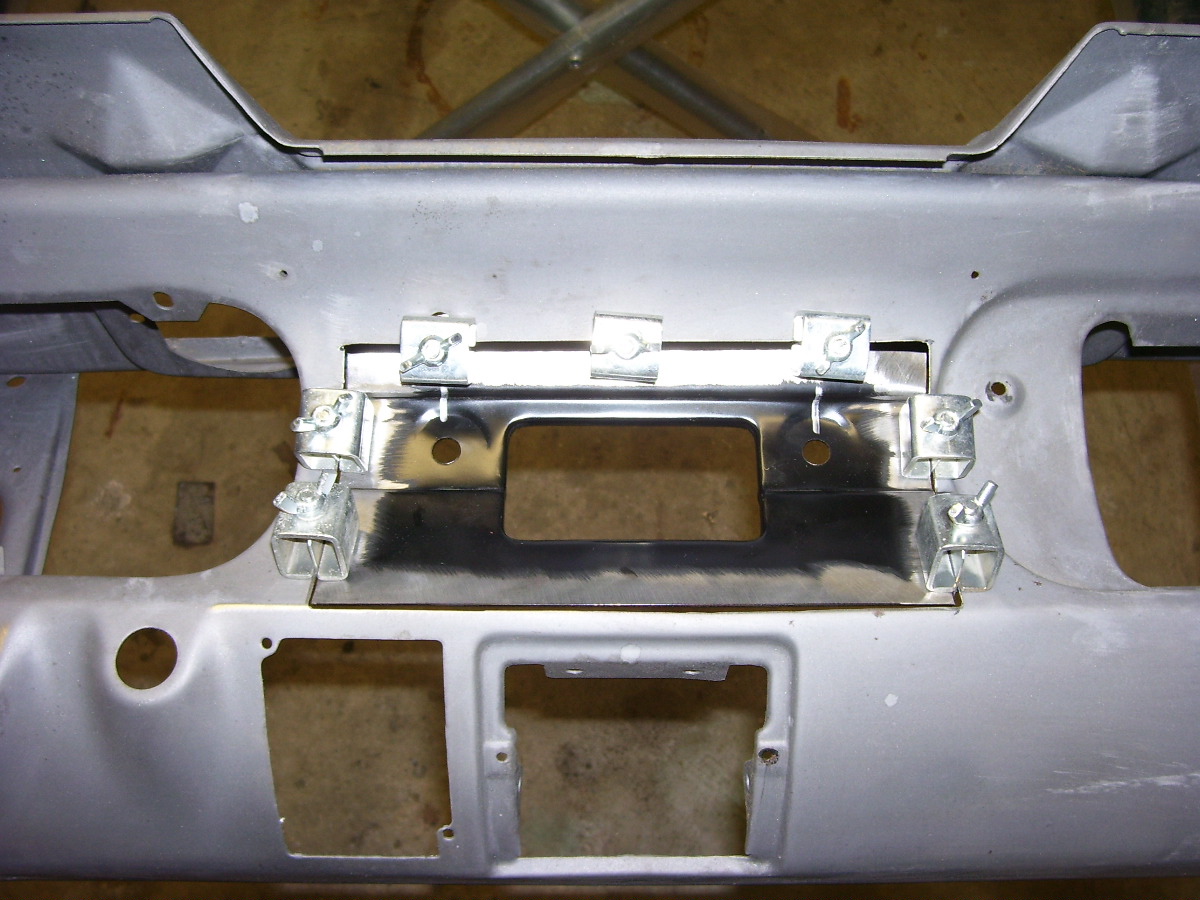
And check out the new seat platform,,, see anything unusual with it?

I had a set of new seat platforms for a 65 Mustang that I was going to modify,, (cut & lower) since Brent & I are so big,,, But then the article in Mustang Monthly came out about Dynacorn's new 69-70 Mustang seat platforms,,,, that basically said, that when fitted into the 64-68 stangs,, it would lower the seats. 

That sounded just like what we were looking for, so I got a set of them the other day, and was very pleased to see that there is quite a difference in the height of the 69-70 platforms. Also when I set the right side platform on the floor I just installed, the new platforms fit waaaaay better than the 65 platforms,,, go figure! I'll go a bit more into detail of these in a couple of days.

Now present day,,,,,,,,,,,,,,,,,,,,,

Today, we spent several hours re-organizing the garage & both sheds,, trying to clear out all of the clutter & and removing all of the parts that were in our way,, until they're needed. WOW,, what a difference! It's always nice to have some room to move around,, and to be able to get to things a lot easier. 

I then figured we'd give it the ole college try, and see if we could repair the screwed up dash, where someone thought it would be wise to terrorize the sheet metal in the Radio area. I've been dreading doing this, but now that the garage was clean,,, what the heck. Here's some of the processes that we went through.

What we started with: (Nice huh?)


I got one of those radio repair panels,, and decided it was best to leave those nice factory edges alone, and basically just do a repair patch. 


So I trimmed off the edges of the new panel and marked the old area that needed to be removed, and easily cut it out with a nice 4" cutting wheel on the die grinder. 


Once the new panel was fitted into place,,, I proceeded to tack it into place. Then, with a bucket of water, and an old cloth rag ready to go,, I welded in the panel, an inch at a time,, constantly changing positions & wetting the newly welded areas to keep it from warping. And this is what it looked like.


It doesn't look like much at first,,, but with a little patience & a couple of types of grinders & sanders,,, it comes out looking like this:


Even I was surprised at how well this came out,,, I thought for sure we'd have to use some bondo to finish this panel off,,, but once I was finished,,, primer will be more than enough to make this repair invisible to anyone. 

We also started the process of fitting the radiator support & the RF battery apron on the car. What a difference,, different brands of parts make, when it comes to fit. I just had to get a new battery apron from CJ Pony, because the last piece of crap I bought, didn't fit worth a hoot. These parts seem to be much better,,,, I just wish I had some dimensions to go off to double check the alignment of everything before I go welding everything together.


Still a ways to go,,, but hopefully it will be done some time soon.

Till the next time,, Cya!


Monday, August 9, 2010

Post #20, 8/9/10 Metal repair

65 Mustang Restoration

We spent the last couple of outings in the garage doing some metal repair. It's an extremely tedious job,, but it has to be done sometime. Most of the areas that we repaired, were sections of sheet metal that were damaged while removing the rusted out panels. Spot weld removal is definitely a tricky job sometimes,, even when you think you got it just right,,, rip,,, followed by,, "oh crap, more work".

Though there were many, many small repairs,,, here are just a couple of the sections that we repaired.

Before:  

and After:


Sometimes the holes are just too big, therefore requiring some metal patch work. The next photos basically just run through the different steps involved with replacing a small section of old metal,, with a nice new piece of sheet metal that I cut & formed with a hammer & a duck-bill. The whole process only took about 30 minutes to do it right.


We start by removing the bad section & forming a new section,,, it doesn't have to fit perfectly,,, actually, it works best if the new section is slightly a bit too small, so that there's a .040" gap where the metal is to be welded.

You know the old saying,,, "Measure twice,,, cut, shape, pound, bend, shape some more". As you can see,, it helps to have several types of clamps. Also, whenever possible, use a copper backing plate when you weld the gaps,,, the job can be done without it,,, but it sure makes it much easier when it's used. 

It helps to put you small tack welds out at the corners,, and start your welds out at the edges, since there's less chance to blow out the metal since it's still cold.

The welds don't have to be beautiful,, but they do have to completely fill the gaps,,, let it cool a bit before you start the grinding process.


And there it is,,, a proper patch panel that has been butt welded into place. It makes no sense to replace an entire panel when only a tiny portion of the metal needs replacing,,, you save a ton of time & money.

Till next time,,,,,

Monday, August 2, 2010

Post #19, 8/2/10 RF floor support

65 Mustang Restoration

Work is going slowly, mainly due to lack of time, but I finally brought home the new Lenco Spot welder that we got for the restoration. This is a pretty nice little machine.


This is the simplest welder there ever was to use,,, just place the 2 wand tips down on the metal you want spot welded & squeeze the trigger. The only adjustment on this welder is the knob that adjusts the amount of time-duration for the 2 welds(longer for thicker metal). Each time you pull the trigger, 2 nice little spot welds appear. The really cool part is,, you can place the 2 tips side-by-side,,, you don't have to put the on opposite sides of each other. 


Since this was a new tool,,, we figured we had better practice with it first, so we found a couple of scraps and went to town. Tip: don't go too long, you'll melt right through the top layer. This is going to be a big time saver!


Next we installed the rr torque box metal patch panel,,, man does the spot welder work nice!


I actually only had to weld the one side of the panel in with a regular mig welder. It takes a bit of time and patience to smooth out the welds,, but if you're going to do it,,, do it right the 1st time. That's how a panel is supposed to look after it's installed! Also, before we welded the panel in,,, on the areas of the panel & the frame section below it, where they touch each other, we sprayed the parts with Eastwood's Copper Weldable Primer to help protect those surfaces from the elements. 


We then moved forward to the RF Floor Support that we got from Laurel Mountain Mustang. This is an extremely beefy part that fits perfectly. We did a quick test-fit,, marked the holes for drilling(for spot-welds),,, and then coated the mating surfaces with some more Copper Weldable Primer.


Reinstalled the floor support, clamped it into place,,, triple checked all of the measurements,, and welded it in.


36 spot welds,, just like they did from the factory,, only beefier. I just have to blend in the welds a bit. Brent stood on it after we got done, and bounced up & down several times to test it out,,, it passed. One of the nice things about the beefy supports,,, if & when someone jacks the car up by this area again in the future,, these supports shouldn't bend & buckle like the factory one did. 

Till next time,,,,